
How to align camera with the chart

The camera should be placed exactly in the middle of the chart, and there is almost no room for error - the depth of field for 100 mm lens at F8 at 100 inch distance is just 10 inches.

All printouts have been glued with the rubbing cement to the foam board ( let's assume the board is flat.) At the center I have placed a round mirror around 5 cm in diameter attached with the pushpins for easy removal. In hindsight, I guess I should have gone to an art store ( say Blicks) and bought a prefabricated canvased frame 24x36" for $20 . Now I have this contraption hanging on a wire against the wall. How do you make it vertical?

I discovered such a thing as a self-leveling (!) laser levels. I bought the cheapest one for $25 which was almost useless, but the next one for $60 had important feature: the plumb dot which mimics a plumber's line. It happened be very handy to mark exact location of the device on the floor for the future shoots. Built-in bubble level may be useful too - but it is not required.

Now mount the laser level on a tripod , turn on the cross-pattern mode, let it self-level and have the crossed laser lines hit the chart. The green or red lines will help you to adjust the chart so it's strictly horizontal. The mirror in the center will reflect the lines back toward laser level. Now adjust (I have glued special screws for that ) the board so the reflected(!) laser line crossing is projected back at the laser level 's output window. As soon as this is achieved, you are practically guaranteed that mirror (and the chart) are vertical ( given that mirror is pressed firmly flat against the chart board) and you now know the location of the line perpendicular to the board and piercing it center.

It's time to introduce your camera in the setup. You should have already marked the spot where camera should be located so it is placed at the proper distance from the chart. The proper distance means that whole chart image fills the whole 35 mm frame. (How to achieve this if the viewfinder has less that 100% coverage is subject to another post).

The laser lines projected on the back of the camera give you the reference plane which will put your lens at the right the angle to the chart yaw-wise. Work your camera tripod to lift or lower the camera until you see the lens reflected in the mirror and the lines in the center of the board cross your camera focusing points or anything marking the center of a viewfinder.

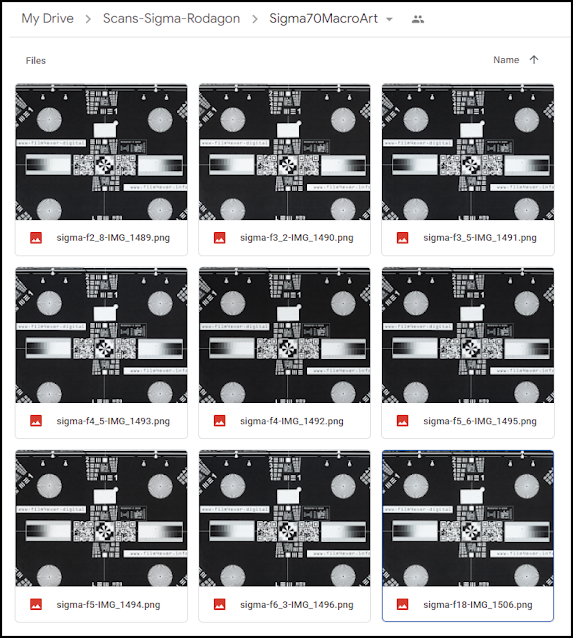
(Note the pictures have been made during different runs so you see two different versions of chart)
Set your camera autofocus to multiple points as the single central focusing point will be looking at the mirror and AF system will be confused. Your camera is set up and ready to shoot. (BTW if your camera is digital avoid laser light hitting the sensor directly)

Viewfinder view (Canon Elan 7e) with camera lens' front reflected in the mirror on the chart.


Comments
Post a Comment