
How to scan transparencies using tethered camera
I spent all day yesterday scanning my old slides. Here is my approach:
- I used 75 W CREE lamp bought in home Depot. While I do have dichro lamp house C760 , I decided against it to avoid dealing with the heat. CREE lamp was on for hours in the end without any issues.
- I tethered my Canon Rebel T4i camera to my Windows 10 desktop running EOS utility using some old USB cable ( I suspect cable may affect the connectivity so I always use the same one known to work) and camera was running tethered for hours.
- I set up everything - lens, holders, light etc in working config.
- I removed the slide from the holder so my
lens was seeing the light diffuser. I put EOS utility in live view mode and used color picker
to white balance camera against diffuser. My live view on screen became gray. I
deselected picker to freeze my white balance. Note how Red, Green and Blue channels get aligned with each other.

- In the EOS remote interface I change the expose compensation to +3 and made the capture. I immediately imported jpg in Photoshop and ran picker around the screen. I had RGB reading around 251,251,252 to 254,254,254 across the screen with slight variation between colors. I had proven that my light source was producing pure white (as seen by my camera) of maximum intensity still without clipping. Thus I had reached my base configuration. My base settings were 1/100 sec, F7.1 , ISO 100, lens Sigma 50 mm Macro DG.
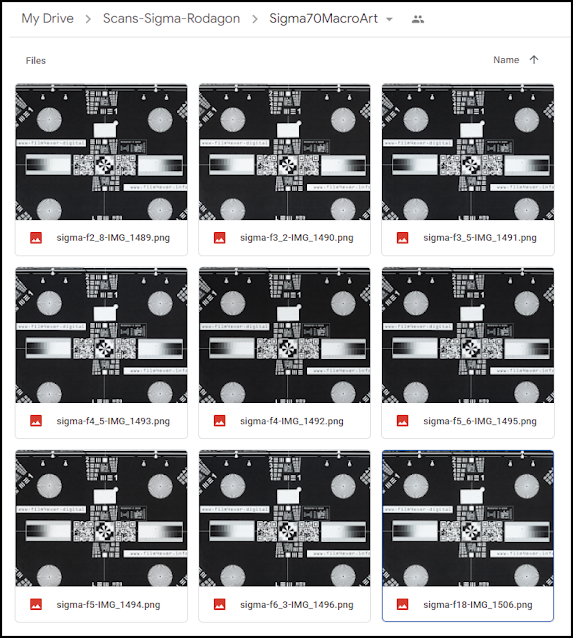
- I have my USAF 1951 test target mounted in the same type of slide mount the rest of the slides in my batch are encased, and i inserted the said target into my Nikon ES4 film holder, put the camera in Live view and turned magnification. I made small adjustment to my holder orientation while switching between corners and the center of the transparency. My capture was set for sharp capture in all corners and the center. I also adjusted distance between lens and original to have all of the frame captured. Focusing and defocusing lens proved that all elements on the test slide were coming into focus simultaneously (because of high contrast and the sharp elements' edges my target affords me very sensitive way of achieving sharp focus)


- Now all I have to do was to insert my slides into the holder, and do the capture. Immediately raw file and jpg were sent to my computer. I could pull them in PS for inspection or just continue shooting.
- Note about exposure: if your slides are of good exposure and have very nice and transparent highlights like sky or clouds, you may use the same exposure every time - the one you set while shooting the diffuser without slides. You may use that settings for all you slides - the captures will reflect the actual brightness of the originals. I observed that for my slides (40 years old ORWOChromes ) the dynamic range was just enough to capture everything from highlights to darks in one shot. Few Kodak slides of 10 years old seemed to have been captured fine too.
- If your slides are sort of on the dark side and you want to lighten them up - you can do it by changing exposure by 1/2 or 1 stop. You may bracket if you like.
- From shooting couple of dozen slides I can say that I didn't have to deal with any cast and if I wanted to preserve initial slide's color balance and feel, I did not have to do any post at all.


Comments
Post a Comment