Posts

Showing posts from 2020

For your cook-book. New Year recipe for Film Digitizers

Image
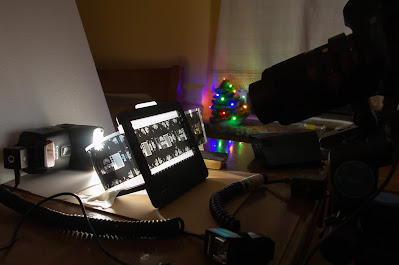
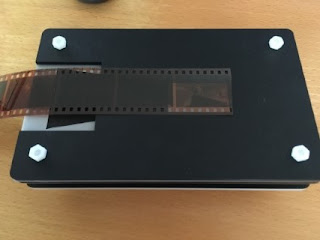
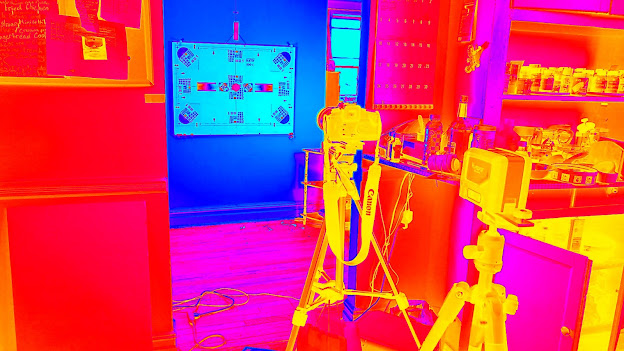
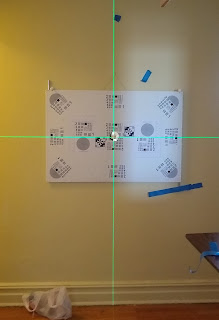
The countdown to New Year’s has started, and speaking of countdowns… there’s only one easy way to cook... mm to scan all your film before you pop your champagne open! Here is the recipe and some pictures. INGREDIENTS 1 DSLR camera (can be be substituted with mirrorless) 1 Macro Lens - Sigma 70 mm Art DG is recommended 1 Benro Geared Head 1 Lens coral 1 "Pixl-latr film holder" 1 6x6 cm glass mirror 1 Flashlight with an extension cable 1 tripod with geared central column 1 remote control or tethering cable 1 (optioanal) camera battery powered from USB source 10 SD cards 3 frames "Vlads Test Target" 0.5 yard of masking tape 1 bottle of Champagne Madame Clicquot - can be substituted with 2L bottle of Coke or Pepsi Preparation time: 15 minutes Scanning time: from 12 am Jan 1 till no film to digitize left. INSTRUCTIONS For the holder: Assemble Pixl-latr film holder as shown, install legs and diffuser. Affix Pixl-latr film holder with the masking tape to the large piece of

How I use Vlads Test Target for camera scanning

Image
So here is my scan rig tuning workflow if anyone cares: Aligning camera and film holder with the  Vlads test target as generator of the test image. The picture is to grab you attention. I used to see it often on my TV when I was 7 years old and was waiting to watch my favorite animated movies which would open the broadcast at 4 o'clock Moscow time . Prepare your scanning rig - whether it's a copy stand or camera bellows with vintage film holder from Nikon, Canon, Minolta, etc. I will assume that camera and lens are able to slide forth and back in relation to a film holder. Ideally you should use micro-focusing rail. Having Arca-swiss clamp sliding on the rail is possible but you will discover that when you start tightening the clamp once focus is achieved, the image will jump by 1-2 mm - pretty significant and irritating shift given overall frame size.    Keep the film gate empty. Adjust lights, mask out stray light, optionally tether your camera to the computer and connect you

New Type 120 Targets are available

Read this post first and then go to  https://www.etsy.com/shop/SilverKnits and see if any targets suit your needs.

New experimental feature - QR codes for resolution measurements

Image
 The central part of the chart has been changed: instead of the "black hole" another USAF 1951 pattern has been placed right in the center of the capture area. Along with it there are number of square QR codes of different sizes. The smallest one still resolvable by a QR reader should be the measure of resolution. Each QR code encodes web address (URL) pointing to the individual web page on site https://www.film4ever.info . That page will eventually contain information about the specific resolution once the value is crowd-sourced from fellow digitizers like you. More details will be added soon.   The QR code online reader ( not affiliated with Vlads test target  ) is located    https://demo.dynamsoft.com/DBR/BarcodeReaderDemo.aspx  but other sites can and should be used as they may use different technologies to recognize QR codes. You may simply drug-and-drop the central part of the scanned negative to this site and observe which QR codes get resolved and click the link on th

Type 120 targets

  Quite a few folks IM'ed me if Type 120 targets will be available any time soon. The answer is yes, i am working on that. The issue with the type 120 design is that folks have different film formats: 6x4.5, 6x6, 6x7, 6x8, 6x9 - that means that the target will be comprised of at least two adjacent frames of 6x6 ( i will be shooting with Pentacon Six i own) so USAF patterns should be located across the frame in such a way that by repositioning the film in a holder each person will be able to have one pattern in the center and couple of them close to the corners. Most likely that means that 6x6 frame will have nine USAF targets and may be more. The gap between frames on film might fluctuate - that's known issue with the Pentacon film advance mechanism. My current 36x24 design will not work so all new chart has to be produced, printed and glued together. If anyone has a better idea or want to lend me (or at least recommend particular camera make i can rent from Adorama) of a

What photographer would not brag about how sharp their lens is?

Image
How to read USAF 1951 Chart? I stumbled upon this article, you may find it handy too.  https://www.optowiki.info/faq/how-to-read-an-usaf1951-target/ "How to read an USAF1951 target? USAF-1951 test charts (also called USAF-1951 test targets) get their name from the designers and the design year: “United States Air Force 1951”. The targets are available in various finishes , for example chrome on glass. The targets consist of “groups” of 6 “elements” each. The group numbers at the top of the group, the element numbers are located at the sides of the groups. Each element consists of three horizontal and three vertical bars. The camera is said to “resolve” a chart element, if the horizontal and the vertical bars can still be recognized as three distinct bars und don’t blur into one another...". Btw, for "Vlads test target" the resolution chart is as follows. Just remember that after you capture the negative with a digital camera and start reviewing which group-element i

What could SR-71 Blackbird see from above?

Image
Before "Vlads test target" came to be, there were some developments which paved way for the now ubiquitous test strips.  As Cold War raged on in the 1950s, US Air Force developed "flying cameras" - super-sonic jets flying at hiesht altitudes and caring nothing else but high resolution camera to perform air  surveillance   tasks. The Sputnik was yet to be launched and the only way to get a sense of what sort of surprise your adversary is preparing was to fly over it (the national borders to be damned) and make a picture of it and then have a small army of analysts to argue what this or that building, channel, railway mean. To calibrate the cameras the  SR-71 Blackbird and the U-2 planes would carry around, the number of terrestrial test patterns were set down - typicaly near airfields. Thats how  test chart known as the 1951 USAF Resolving Power Test Target, conforming to milspec MIL-STD-150A, was developed. The design of the chart establishes the relative size of th

Test target for 6x6, 6x7 and 6x9 films

Image
Update 11/16/2020: Now shipping: https://www.etsy.com/shop/SilverKnits Folks ask often if a test target for MF films will be available. Something is in the works. Subscribe to this blog and you will be first to know when it's available.    I did consider making them in a way that would work as 4.5x6 , 6x6 , 6x9. But to make this work economically I need to make sure I have at least 100 customers ready to pay more than the current rate. Even shipping will be much more expensive as film will require better protection. I certainly have equipment and know how already, but still don't know if I want to get in this rabbit hole again. I can put up Google form to collect the requests and gauge the level of interest , but for now I would not promise anything. If you or anyone would send me any unneeded negatives on 120 film so I can asses the real-life sizes, that would help, I only have my own film as 6x6 slides.

Essential Film Holder for vertical scanning

Image
Keeping digital camera stable and film flat and pinned to the specific place in space while digitizing are of paramount importance. Without camera looking exactly at the center of the image and having lens optical axis strictly perpendicular to the negatives' plane the quality capture is simply impossible. Film holder takes special place in digitizing process. It has to: keep film flat keep film flat ;-) allow film transport in strips or rolls without any disturbances to the alignment allow framed transparencies insertion and removal without disturbing the system as much as possible ( we know  that transparencies/chromes/slides come in different mounts over the years so it would not be expected that some lens refocusing will not be required).  Good quality uniform light diffuser - preferably built-in. ideally film holder should not be terribly expensive, unless expense of buying tank-like-built  film holder is justified by huge volume of scans.     Let's take a look at   Essent

In search for the Holy Grail of Film

Image
To successfully assess DSLR scanning capabilities I needed 35 mm film which would not be outresolved even by the high-end  digital camera. Of all the chart pieces the real drama happens right there - in parlance of USAF 1951 - at Group 0 (zero). Say, if Group 0 Element 5 to be resolved, the lens +film resolution should be at least 87 lp/mm (calculation are based on my USAF targets dimensions and the shooting distance/lens focal distance). Just think of it - you are in front of a chart 24x36 inches (60x90 cm) at normal viewing distance - say two feet - will you be able to see the strokes of size 0.3 - 0.5 mm ? If your vision is 20/20 you probably will, but barely. The same is true for the camera as we will see below. So what film we should use and how to get it? Even if film+lens give us say 90 lp/mm what your digital camera will be able to capture? Read on... Even half a year ago, I was not familiar at all with the films sold nowadays in American stores. In B&H and Adorama prominen

How to illuminate a flat object uniformly

Image
Just recently I was working on the project that involved shooting 24x36 inch poster on high-contrast film. The uniformity of board illumination was absolutely crucial as film being of high contrast would immediately amplify even slightest differences in my target brightness. My light source were three CFL photo lamps - one placed well above the camera and two other on the sides. To add insult to the injury the lamps were of different output and age so just placing them on the equal distance from the chart did not solve the problem. Of course I did not have any decent light meter, as my last Selenium based light meter lost its senses many years ago. Certainly I could use my digital camera as a spot light meter but that was a pretty clunky solution. I wanted to see the whole chart and be able to move lights around and see immediately the result. At some point the light bulb went on (pun intended ) in my head - I realized that I can use "heat map" - the approach in which ea

How to scan transparencies using tethered camera

Image
I spent all day yesterday scanning my old slides. Here is my approach:   I used 75 W CREE lamp bought in home Depot. While I do have dichro lamp house C760 , I  decided against it to avoid dealing with the heat. CREE lamp was on for hours in the end without any issues. I tethered my  Canon Rebel T4i camera  to my  Windows 10 desktop running EOS utility using some old USB cable ( I suspect cable may affect the connectivity so I always use the same one known to work) and camera was running tethered for hours. I set up everything - lens, holders, light etc in working config. I removed  the slide from the holder so my lens was seeing the light diffuser. I put EOS utility in live view mode and used color picker to white balance camera against diffuser. My live view on screen became gray. I deselected picker to freeze my white balance. Note how Red, Green and Blue channels get aligned with each other. In the EOS remote interface I change the expos

How to align camera with the chart

Image
Before the chart with the USAF targets, gray scales, etc. can be photographed, it should be suspended vertically with the decent precision.  The camera should be placed exactly in the middle of the chart, and there is almost no room for error  - the depth of field for 100 mm lens at F8 at 100 inch distance is just 10 inches.  All printouts have been  glued with the rubbing cement  to the foam board ( let's assume the board is flat.)  At the center I have placed a round mirror around 5 cm in diameter attached with the pushpins for easy removal.  In hindsight, I guess I should have gone to an art store ( say Blicks) and bought a prefabricated canvased frame 24x36" for $20 . Now  I have this contraption hanging on a wire against the wall.  How do you make it vertical? I guess you recognize those screws ;-)   I discovered such a thing as a self-leveling (!) laser levels. I bought the cheapest one for $25 which was almost useless, but the next one for $60 had important feature:  th

How "Vlads test target" came to be

Image
Here is another   DR;TL.  (from my post on FB ) I am thinking about publishing the series of posts describing minute technical details about how "Vlads test target" was and is actually produced. The project took roughly eight months and between hundred and two hundred hours of labor. The result adorns FB "Digitizing film with a digital camera" group title page.   Now I want to share some technical details as they might be just handy to anyone who still shoots film. I want to thank all members  of the group as they gave me the inspiration and tons of technical advice and know-how. On the   other side I am thinking about publishing these notes on some photo-website - so the audience will not be limited to this private group but whatever I learned will be available to anyone who can google. I have not contacted any particular web site yet and is actually open to suggestions which one has a wider reach. Certainly the other goal is to advertise the availability of those