
Using Vlads Test Targets to Fine-Tune Film Scanning Rig

Part 1. Using Vlads Test Targets to Fine-Tune Film Scanning Rig
So you decided to scan your film yourself. These days this is quite a common and wise decision. You either decided to convert the priceless shots in your film archive or you just started your journey as a film photographer and want to share your best (and worst :-) ) shots with friends and mentors. You have to convert your film shots into digital form and be able to share them with a click. The task is not new and since at least 20 years ago was widely available everywhere - from chain pharmacies to professional photo labs. The option to save money has always existed - you would buy your own scanner and off would you go. Many folks went that route and got lost. The time it would take to scan a few frames or a roll of film was anywhere from 10 minutes to hours. Paying extra 7-10 bucks for scanning was no longer such a costly proposition.
Fast forward to present times. The landscape has completely changed. Photo Labs are very few and far in between. The film selection is getting narrower every day. Everyone has a decent image capturing device in their pocket or purse. And still the analog photography as it's called now started growing again. But with a caveat. The film still has to be converted to digital format and the costs are still high and turnaround time seems like forever in our instant ratification scheme of things. Yes, you can certainly print your negs on paper, but before anyone would commit to printing on paper they want to at least visualize the shot, have a plan for what they do in the darkroom.
The question comes very naturally to everyone who has a digital camera why film cannot be photographed with a digital camera in a snap. It would only take an instant compared to using a scanner. And it is! The trouble though lies in the fact that not many folks have experience with macro-photography. But indeed: photographing the frame of film with a digital camera is in effect an exercise in macro-photography. And macro photography has its own quirks and rules. If one wants to faithfully capture the transparency or film negative, the creativity and inspiration leave driver's seat to the precision and patience.
That work starts right at the front element of the lens. The lens should exhibit true macro and flat-field capabilities. No zoom lenses ever produced good captures, regardless whether they are marked as Macro or not. The image captured with the lens should be uniform from edge to edge, it may not be of sharpness of an astronomical telescope, but rather should render the image with the good uniformity so no part of the picture call attention to itself for being too sharp or too soft compared to the other parts of the image. Real macro lenses has a scale engraved all up to 1:1 ratio.

The next thing everybody knows about macro-photography is that at magnification 1:1 the depth of field is really paper-thin. In practical terms, that means that one has a wiggle room of about a fraction of a millimeter to place the film original in front of the lens. That means that the plane of the film should be absolutely perpendicular to the lens' axis and parallel to the sensor. Otherwise some part of the image will be visibly different from another.
That rather long introduction was to emphasize the importance of having your scanning rig (the term folks who digitize film proudly apply to their contraptions) be capable of precise adjustments and keeping those adjustments firmly in place for the duration of your scanning session. Finally this is where we come to the reason why everyone who has a scanning rig needs a precise tooling to fine-tune their rigs. The tooling is two-fold - for one it is a properly constructed, rigid enough mechanical system which keeps camera, lens, film /film holder in their places and for the second it is special reference image - test target which allows the user to fine-tune the gear by observing a number of easily identifiable cues.
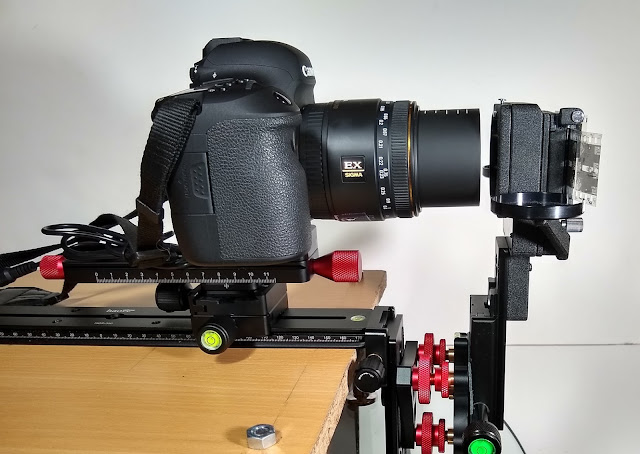 |
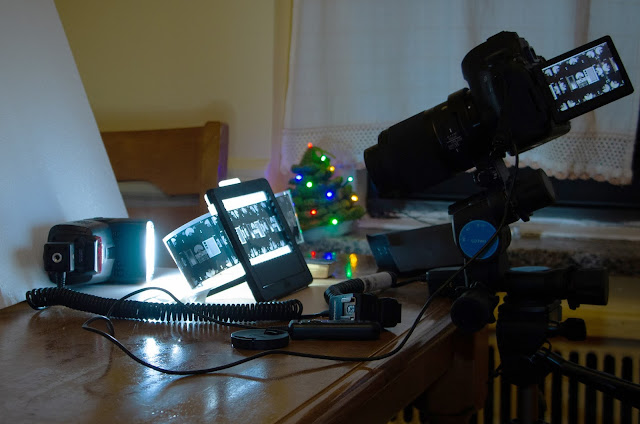
| One of the scanning rigs Vlad built over the years |
This is when Vlads Test Target comes in from the cold. In a nutshell, Target is a piece of 35 mm or type 120 (roll) film with high-resolution, high-contrast images. Being placed in the film holder at the beginning of each scanning session the Vlads Test Target serves as a reference image and allows users to assess all the quality factors listed above. The targets themselves are produced from a unique Adox CMS 20 Pro film - the highest resolution film available today short of photoresists used to manufacture computer chips. Under normal conditions the Adox film grain is simply not discernable and plays no part in the focusing process. Instead, the Target has a number of elements which help with focusing and with checking the focus - center vs. corners, right side vs. left side or top vs. bottom.
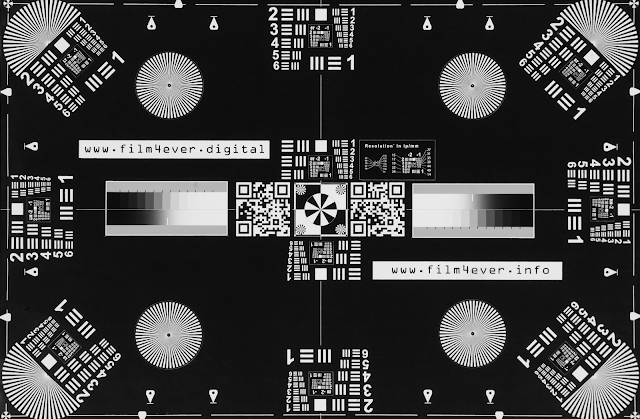 |
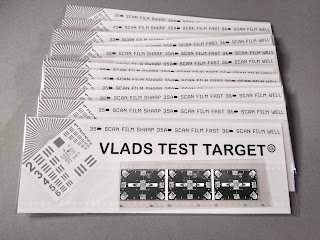
| This is actual scan of the latest Vlads Test Targets (2021) |
The Target also has a number of famous USAF 1951 resolving power charts which help assess the resolving power of the given lens/camera combination or even quantitatively compare one lens vs. another. The unique production process (though carried out completely in the confines of Vlad's own photo lab) allows for the on-film resolution high enough not to be out-resolved by professional grade digital cameras (up to 42 MP so far) , making it ideal for camera scanning . The similar targets on glass substrates cost order or two orders of magnitude more and are not geared up for the specific task of film scanning.
So enough of a sales pitch, let's assume you are already a lucky owner of the strip of Vlads Test Targets. So what do you do to take your camera scanning quality to the new level?
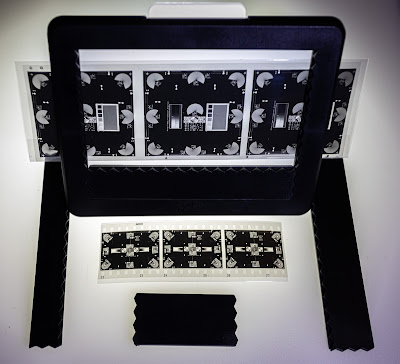 |
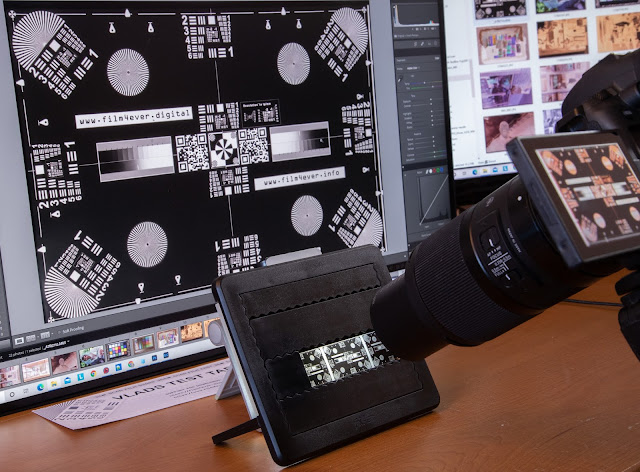
| pixl-latr with Vlads Test Targets - type 120 and 35 mm (2020) |
Here are the basic steps. Given the variety of scanning rigs the steps for your particular setup might be slightly different.
Step 1. Perform initial alignment. By any means possible align your camera's sensor and the film plane. The most common and very effective method is to use a mirror and have your lens' aperture blades' image placed exactly in the center of the mirror. The detailed description of the process can be found here. Why am I saying this is a preliminary step? Because most of the time one cannot place a mirror inside a film holder (especially if we are talking about 35 mm film). The mirror laying on top of the holder may or may not be ideally parallel to the film plane. But most of the time that is a very good starting point.
Step 2. Place Vlads Test Target in the film holder - say pixl-latr. Thru the holder's gate, expose the frame in the middle of the strip, so the holder keeps the film as flat as it is designed to do. My personal preference is having an emulsion side facing lens, but most of the very experienced and professional users say that side does matter in the optical sense. I do believe that from a mechanical point of view most holders provide better flatness when emulsion is facing the lens. You may experiment and that's something you can decide yourself by carefully examining film curvature by naked eye and LED flashlight .
Step 3. Turn on the camera and switch it into Live View mode. If your camera has "focus peaking" mode, turn it on. Ideally your camera should be tethered to a computer so you can observe the targets on a big screen. Certain cameras allow the signal which regularly feeds the camera display to be simply rerouted via HDMI output to a screen without any computer and software. Unfortunately, Canon cameras lose their "focus peaking" feature when an external monitor is attached via HDMI output.
Step 4. Now start focusing. Depending on camera and lens many folks are pretty happy with auto-focus mode while doing camera scanning. For my personal camera/lens combination Canon EOS R/Sigma 70 mm Macro Art that does not work well and I typically don't use AF. But anyway, it's too early for AF mode to kick in . Use manual focusing ( and focus peaking which is available in MF mode only) to methodically check the different parts of the image. At this step we are not looking for the best focus, we are checking that all parts of the image come into the focus simultaneously. That is actually the sign that the film plane and sensor are properly aligned.
I typically would advise against lens' control being used for final focusing - instead the camera and lens should be mounted on a micro-rail so they can be moved as a whole. Extend the lens once to the degree where the image fully covers the viewfinder. That means the proper reproduction ratio is achieved. Now use micro rail to fine-focus the image and move camera /lens assembly forth and back while checking for sharpness across the field. If you use a tripod to hold the camera you can't do that, so you should focus using the lens. And that 's where you can see how Siemens stars strategically placed across the target come into focus. Now, take a picture, send it to the computer and examine elements of the USAF 1951 chart. Make sure that elements in Group 0 across the target frame edges and the corners are equally sharp (resolve to the same element or next element within the group ). You will not be able to focus on the film grain as this film is too fine-grained.
If Siemens stars come into focus simultaneously and USAF 1951 fragments give you similar readings - you are golden . Carefully remove the strip with Targets , place your originals into the holder, adjust lights as needed and command yourself "Motor, Camera, Action!"
If Siemens stars get grey at different positions while you operate micro-rail - that means the film is misaligned and you have a job to do. Work with your rig until Targets come clean and aligned. That's actually one of the main purposes of Vlads Test Target - making the arduous task of aligning the film holder much easier and more productive. Given the high contrast of the test pattern the focus control becomes a snap.
After you spend some time with Target you will be able to use all elements of the image to judge if sharpness and uniformity are reached. Keep in mind that if you use a mirrorless camera you can check sharpness and overall image while the aperture is stepped down to its working value - typically two steps down from its maximum opening.
Part II Using Vlads Test Targets to Evaluate Lens Quality and Compare the Lenses.
USAF 1951 power resolution chart was developed by US Air Force in 1951 to train the lenses and cameras on its high-flying spy planes. Even today the typical pattern with logarithmically shrinking bars can be found in the vicinity of some air bases.
USAF 1951 Resolving Power Target still used in the optics industry and exceedingly high resolution charts are being produced by depositing chrome (metal) on glass substrates. Each such target costs hundreds of dollars. While industrial-made targets can have 250 lp/mm resolution or higher they are certainly overkill for a digital camera. Each sensor has a pitch - the distance between photosites - so their resolving power is just fixed at a certain level. But different lenses will still exhibit different behavior when used for camera scanning. Richard Karash spent a lot of time and effort and he has produced a comparative ranking of the lenses one may encounter on eBay or estate sale. With Vlads Test Target anyone can compare the lenses stashed in the closet. Here is the suggested procedure.
For each lens perform the alignment procedure described above. Make sure that the target's image produces the same size image on your sensor. When optimal focusing is achieved, take a RAW shot of the target, clearly mark it and send it to the computer. Open image in any application capable of opening RAW files and start image evaluation at a certain level of on-screen magnification.
Review each USAF1951 target and find the smallest group of bars which can be still read separately in both horizontal and vertical direction (we call this resolving the element).
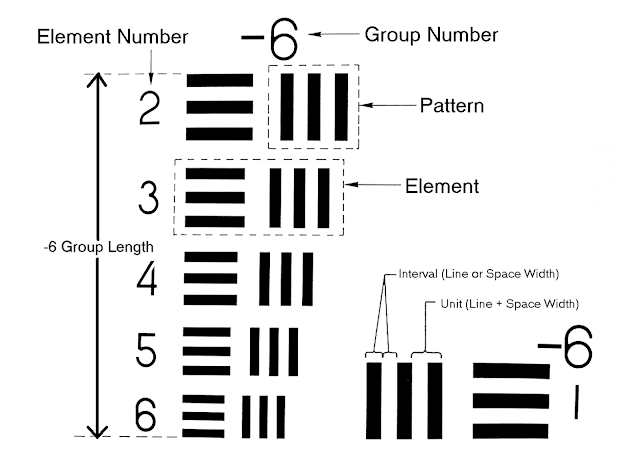
Right down on the paper or enter in spreadsheet the Group and Element number for each chart. They all come with code names so they can be easily identified on screen. Have a line of those Groups/Elements numbers for each lens. Once all the lenses are checked, review the spreadsheet.
Those lenses that have higher element number are sharper, those lenses which have more consistent reading between center and sides may be better suited for camera scanning.
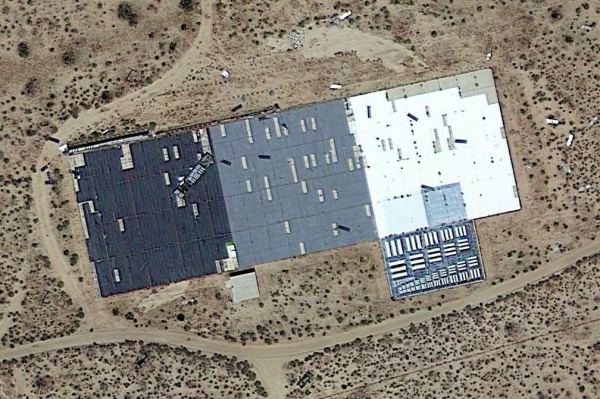
The small chart Resolution lp/mm in the center of the image actually provides the resolution value for each Element in groups -2, -1, 0. The average 24 MP camera with the decent lens resolves Gr 0 El 2 (62 lp/mm). Anything better is considered a very good result, but only cameras with pixel-shift can go to something like Gr 0 El 4 (78 lp/mm). For comparison the picture of the film taken under optical microscope shows resolution G0 El 6 (98 lp/mm).
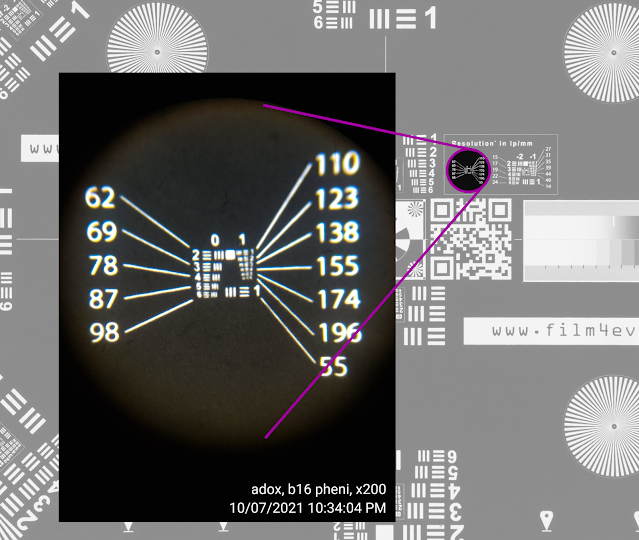 |
| Actual photograph taken with 200x microscope of the "Resolution chart" fragment on 35 mm target(2021). Click on the photograph to see it in the full screen mode. |
That's basically the procedure on how one can compare lenses and earn some bragging rights. Basically many people on different continents were able to compare their scanning rigs by simply stating their Group and Element number . There is also a public, crowdsourced database with the results .You may compare your results and report your findings by adding entries to the community database (kudos to David Warner) https://airtable.com/shrjmJ0llmajH0kFI/tbldvxFkhtUOgeUJX?fbclid=IwAR1vDcsqfrdSBN7-HCcSY7f1Pf3TZZI-Nlt5i1Qhfny4aLXgeNqjneiEwFI by filling out the data entry form at https://airtable.com/shrS2AIpbQB27hSJq?fbclid=IwAR0vuJ9U13VbSzdYoQ9faJaX6J2q7akBAoiEcfjwhVbc2STNgvnILf9sHTc

Comments
Post a Comment