Posts

Showing posts with the label 135 film

35 mm alignment strip

Image
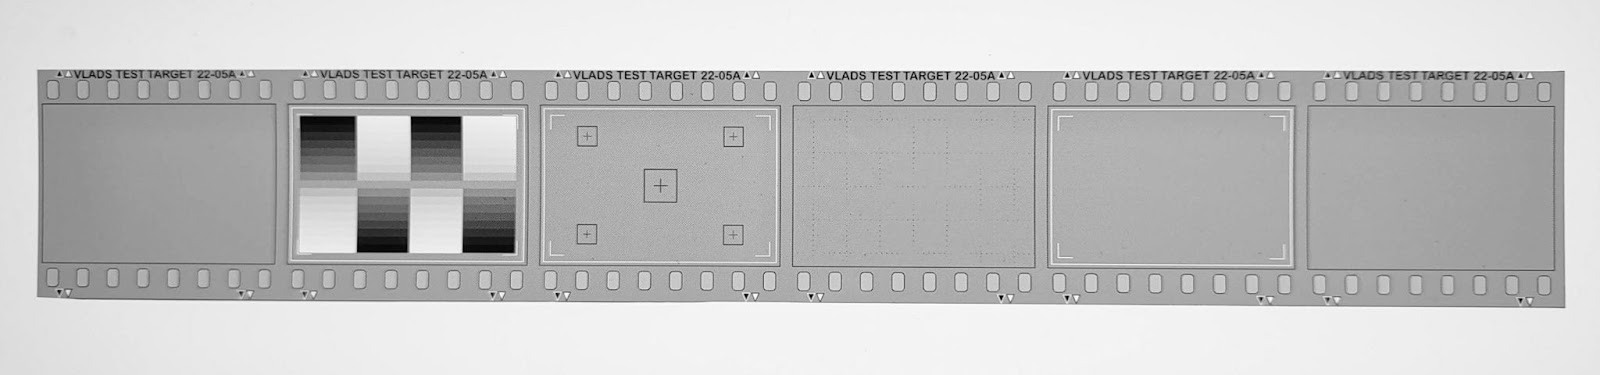
  Vlads Test Target has addition to the family - “35 mm alignment strip” "35 mm alignment strip” is the high precision test target executed via high-fidelity laser printing on specialty Agfa-Gevaert photographic film. Because of how it's made, the image elements are geometrically perfect - lines are straight and parallel to each other, the fine raster is very uniform and is distortion-free.   IMG_20221225_153412141.jpg What does that bring to the field of camera scanning? The target geometrically resembles a 35 mm film strip (type 135). All markings on film are per the spec, including the 24x36 mm frame which corresponds to the typical film camera gate. While positioning the strip in a scanning film holder, user can observe exactly how the actual negative will fit in the film holder and any parts which might be exposed or obscured. IMG_20221225_154220492.jpg The target also contains marking 23x35 mm depicting how a typical mount would mask parts of the frame to remove the edge

Type 120 Positive Test Target PO69

Image
Here is more details on new Type 120 Positive Test Target PO69. This is exact reversal of the Negative Test Target NG69.   The note from Vlad:  The reasons why I started offering the Positive Test Targets are as follows. Everyone who used negative targets while viewing images in the digital camera have encountered the strong hallo around target's bars and stars. That's because camera sensor averages the brightness of the scene and sets certain exposure values. Given that most of the image is almost black (in case of negative) the camera brings brightness up until black areas look gray. That means that transparent areas with bars and numbers are getting overexposed (they basically end up being in Zone 0) . That forces operator to manually step down camera to avoid those overexposures .  Still the halos remain the issue and interfere with the focusing. With positive targets the i ssue will go away - the sensor reads mostly transparent areas, the averaging will lead to whites bei

Using Vlads Test Targets to Fine-Tune Film Scanning Rig

Image
Part 1. Using Vlads Test Targets to Fine-Tune Film Scanning Rig So you decided to scan your film yourself. These days this  is quite a common and wise decision. You either decided to convert the priceless shots in your film archive or you just started your journey as a film photographer and want to share your best (and worst :-) ) shots with friends and mentors. You have to convert your film shots into digital form and be able to share them with a  click. The task is not new and since at least 20 years ago was widely available everywhere - from chain pharmacies to professional photo labs.   The option to save money has always existed  - you would buy your own scanner and off would you go. Many folks went that route and got lost. The time it would take to scan a few frames or a roll of film was anywhere from 10 minutes to hours. Paying extra 7-10 bucks for scanning was no longer such a costly proposition.  Fast forward to present times.  The landscape has completely changed. Photo Labs

How to Use “Vlads Test Target” for Camera Scanning

When scanning film with a digital camera there are only two absolute musts in regards of captured image: it  should be uniformly sharp and focused from the edge to the edge.  Those two qualities can only be achieved when:  the film holder is absolutely parallel to the camera's sensor plane (and keeps film absolutely flat) and you need a lens which is capable of faithfully reproducing your image at 1:1   scale ( or around that value depending on the camera sensor size and film format)    The first requirements can be achieved by carefully positioning and fine-tuning the camera so that when the image to be captured is in focus, it neatly fills the camera frame, and the center and all the corners are equally sharp. The "Vlads Test Target" (Google it!)   has been designed specifically to allow visual control and the best alignment detection. The Vlads Test Target film strips are so sharp that even the slightest loss of focus causes image edges in the digital camera to b

Digitize Your Film with Confidence - Introduction Page

Image
In this innovative offering, the ten USAF 1951 test patterns are strategically placed throughout the 24x36mm film frame - one in the center, and the others scattered across sides and corners. This unique arrangement facilitates a comprehensive evaluation of the sharpness and focus across an entire negative or transparency/slide in one shot.  P hotographers can now accurately evaluate the performance of their lenses and camera systems across the whole frame. This is particularly advantageous for detecting any discrepancies or weaknesses in image quality, which might typically go unnoticed with conventional  single-pattern USAF 1951 target needing to be moved in camera field of view. Clean, nice, sharp corners make or break the great scanned image    Welcome to www.film4ever.digital - the home of  USAF 1951 Resolution Chart on real 35 mm and 120 film aka Vlads Test Target ! New 35 mm targets with extra Siemens stars (2021) Read here how I myself  use my test targets for film camera scan

How I use Vlads Test Target for camera scanning

Image
So here is my scan rig tuning workflow if anyone cares: Aligning camera and film holder with the  Vlads test target as generator of the test image. The picture is to grab you attention. I used to see it often on my TV when I was 7 years old and was waiting to watch my favorite animated movies which would open the broadcast at 4 o'clock Moscow time . Prepare your scanning rig - whether it's a copy stand or camera bellows with vintage film holder from Nikon, Canon, Minolta, etc. I will assume that camera and lens are able to slide forth and back in relation to a film holder. Ideally you should use micro-focusing rail. Having Arca-swiss clamp sliding on the rail is possible but you will discover that when you start tightening the clamp once focus is achieved, the image will jump by 1-2 mm - pretty significant and irritating shift given overall frame size.    Keep the film gate empty. Adjust lights, mask out stray light, optionally tether your camera to the computer and connect you